
- Log into Rocket – your free asset management system. If you have issues creating an account, contact us at [email protected].
- Add Devices: In Rocket, navigate to “Devices/Users”, then select “Manage Devices” and click “Add Device”. We can assist in importing all or a majority of your school’s devices based on a sheet or .csv file.
- Create Repair Tickets: If you just created devices, you can use the middle Action button labeled “Create Ticket” to easily create a ticket on that device. You can then use the “Create Ticket and Next” to create multiple tickets in a row simply. There is also a “Create Ticket” button in the top right which leads you to an initially blank page to search device or user information to create a ticket for.
- Ship Devices: In the “Repairs” section, click “Ship Devices”. Select the devices/tickets needing repair under “All Open Tickets”, then choose “Create Batch” and mark it “With Shipping”. Generate a free shipping label with your return address saved permanently for future shipments. View a quick video tutorial here.
- Seal and Ship: Package the devices following our Shipping Instructions below and attach the provided free shipping label.
For further assistance or inquiries, contact us anytime. We’re here to help streamline your device repair process.
Shipping Instructions
iPad Mailing & Shipping SOP
Use the chart below to box your iPads (Do not exceed the amount under the box size, the size DOES NOT account for cases, but DOES account for the foam sleeves listed below)
| Box Size |
12x8x4 |
13x10x7 |
14x14x10 |
14x12x14 |
| Number of iPads |
1-4 |
8-10 |
11-15 |
20 |
1. Print your packing list and label in Rocket
Put the boxes together using a H like pattern shown below (3 layers of tape through the middle, and 1 layer on the edges, trim off access or fold neatly):

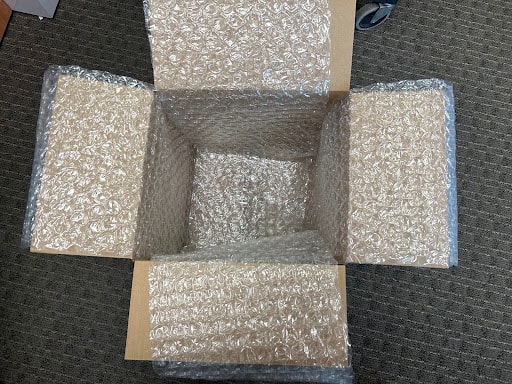
Lay your first two layers of bubble wrap as shown below (Just two long pieces of bubble wrap, you can also use a thinner bubble wrap depending on how much you need/want)
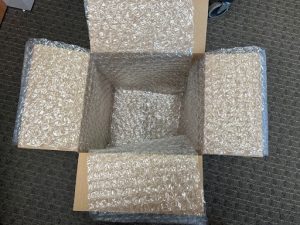
Add another small layer to the bottom (2 squares of bubble wrap should be fine)
Put the iPads into these foam sleeves, then lay them screen to screen in a stack (this ensures that there isn’t too much pressure on the screens during shipping)
Begin adding the iPads, stack them upwards
Once all the iPads are in the box, wrap the bubble wrap hanging over the sides of the box over and around the iPads
Add more bubble wrap to the box until the iPads don’t shift around when the box moves
Add the packing list, and then finish it off with a layer of bubble wrap (Don’t overpack that it’s hard to close the box as this can cause too much pressure on the screens)
Tape the box up like you did to the bottom (Be sure you don’t add too much tape to the edges, as you want this to be neat and professional)
Slap the label, fragile sticker, and battery warning sticker onto the box
ChromeBook Mailing & Shipping SOP
Use the chart below to box your Chromebooks (these estimates DO NOT account for cases, but they DO account for the bubble sleeves)
| Box Size |
13x10x7 |
14x14x10 |
14x12x14 |
| Number of ChromeBooks |
1-4 |
6-7 |
10-12 |
Print your packing list and label
Put your box together using an H-like pattern pictured below (3 layers of tape through the middle, and 1 layer on the edges, trim off access, or fold neatly):

Lay your first two layers of bubble wrap as shown below (Just two long pieces of bubble wrap, you can also use a thinner bubble wrap depending on how much you need/want):
Add another small layer to the bottom (2 squares of bubble wrap should be fine)
Use these bubble sleeves to put the Chromebooks in
Alternate the way the Chromebooks are laying as you stack them upwards, doing this will prevent them from possibly tilting and/or falling over during shipping
Once all the Chromebooks are in the box, wrap the bubble wrap hanging over the sides of the box around the Chromebooks
Add more bubble wrap to the box until the ChromeBooks don’t shift around
Add the packing list, and then finish it off with a layer of bubble wrap (Don’t overpack that it’s hard to close the box as this can cause too much pressure on the screens)
Tape the box up like you did to the bottom (Be sure you don’t add too much tape to the edges, as you want this to be neat and professional)
When to Mail:
Devices should be marked with what day they came in and try to have them completed by the same day the following week, the same as local schools.
- If it comes down to having to finish a local school and only having a few mail-in devices left, prioritize the local since that is a rigid structure.
- Plan out generally what you think your techs can do (~15 per tech) and split them up accordingly to handle both mail-in and local. If you have enough to finish local and get one full box of chrome done, it’s best to do that rather than finish the whole school
The biggest box should be a box of 12 Chromebooks, so if a school has sent in 20 devices, it’s best to just send 12 once they are done instead of trying to send all 20 at once.
- You have to create a batch for each box, regardless of if they are going to go at the same time. It doesn’t make sense to wait for all to be done if you have to do multiple boxes anyway.
- This applies the other way as well, however. If you have 10 devices, it doesn’t make sense to create 3 different batches for each set of devices you can send in one box. Analyze what you have in total and send it out appropriately.
- The only situation this wouldn’t apply to is devices waiting on parts. Use your best judgment with incoming parts to determine whether you should wait till the device is complete or just send the devices. Most times, if you have an estimated delivery date within a week, I would wait, but once those devices have been in the office for 2 weeks and you are still waiting on the part, it would be best to send them.
If you have a particularly busy day of the week (i.e. Tuesday is a heavy day for local schools), it would be best to just delay mail-in repairs a day depending on how busy it is. You could always set a default “mail-in repair day” to try and set a better deadline, such as setting it as Friday to complete all mail-ins on Friday, so that you can avoid having to split up local and mail-in every day, but only do this if you know you can afford to put every tech on mail-in repairs.