Welcome to Rocket! 🚀
Manage your district’s technology with ease
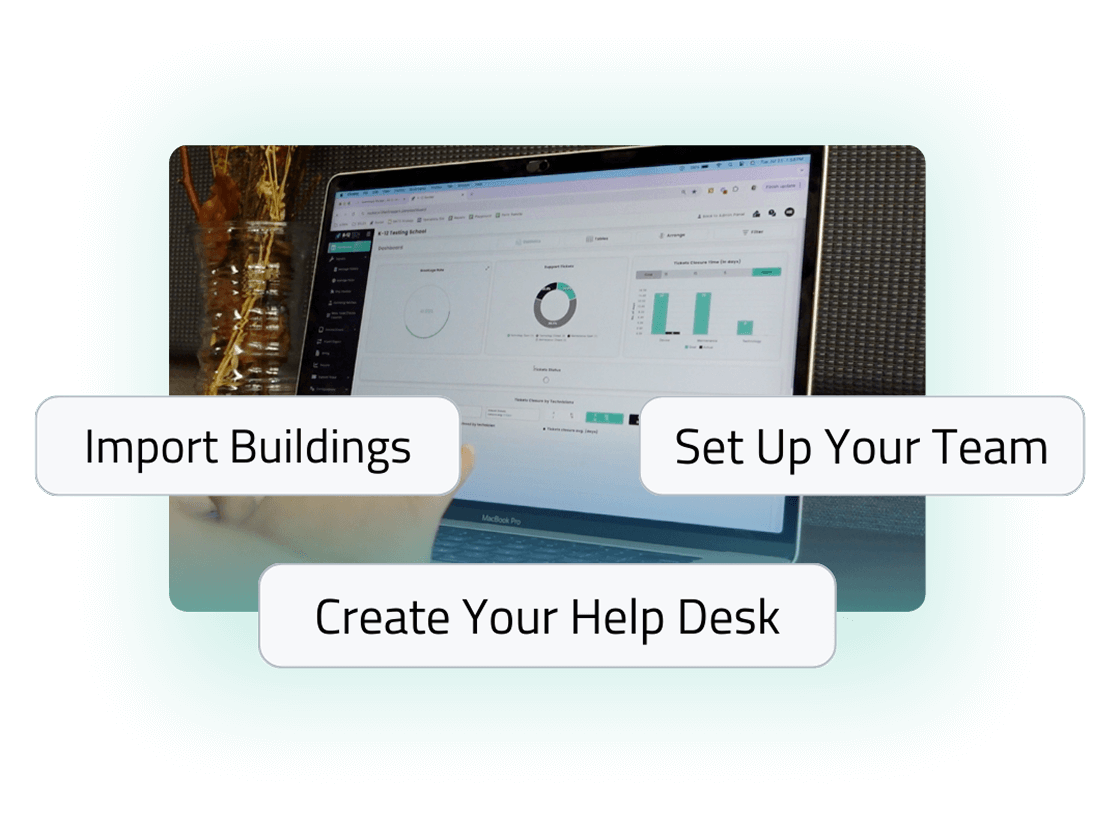
Let’s Get Started
Switching is hard, but these steps will make it easier. Follow the steps or watch this video to make using Rocket as seamless as possible.
Step 1: Add Your School Branding
Adding your school branding personalizes Rocket and makes it easier for staff and students to recognize.
- Click your user icon in the top-right corner and select settings from the dropdown menu.
- Scroll down to the School Information section and enter your school name and details.
- After updating your school name and details, there is an Upload Logo button at the bottom you can press to upload your school logo.
Once saved, your branding will appear across your Rocket interface, making it feel truly yours!
Step 2: Import Buildings & Classrooms
Buildings are a key part in sorting device information. They also impact the Help Desk Tickets, Parts Inventory, and other areas of Rocket.
If you have 5+ buildings —
- Go to the Import/Export tab, and scroll to the bottom.
- Download the template to enter all your building names and any rooms associated with that building.
- Upload the file and click Import.
If you have <5 Buildings —
With a small number of buildings, it will most likely be easier to enter your buildings manually in Configurations > Buildings
Step 3: Set Up Your Team
With Rocket, you get unlimited Rocket Users. Set your staff, and customize their access. Currently, no other email domains outside of the one you used to create your account can be used for staff accounts.
- Go to Configurations and select Rocket Users
- Select “Add Rocket User +” and choose their access level. Click the Information symbol to read the definition of each role. You can now create your own access level in “Roles.”
- If you’re using the Help Desk feature, assign each role with a “Ticket Assignment” under the Help Desk section.
Step 4: Import Devices and Users
Important: Add your custom fields for devices before importing any data. In the top-right corner select “Device Field Settings” to view all existing fields and add new ones.
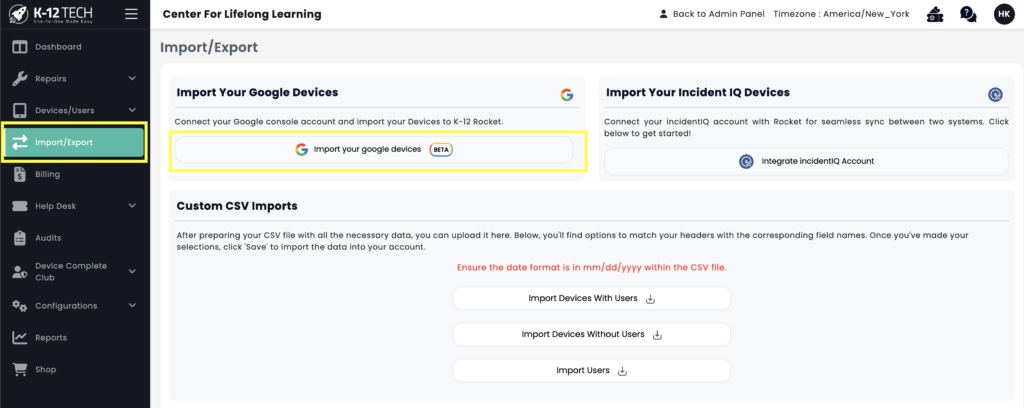
Option 1: Google Console Sync
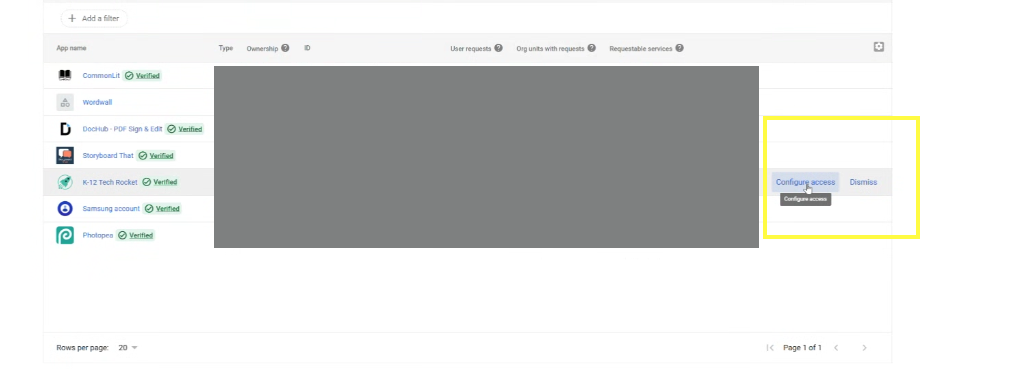
Step 1: Go to Import/Export and click “Import your Google Devices”
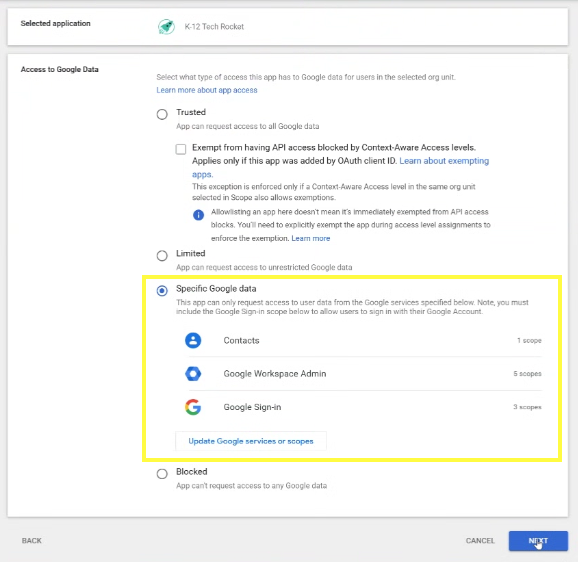
Step 2: Select “Specific Google Data”
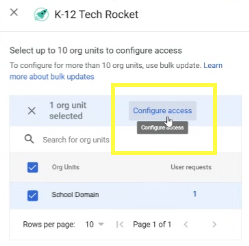
Step 4: Select Configure Access
Step 5: Go to admin.google.com
Security → API Controls → App Access Control
Option 2: Sync IncidentIQ
Follow the steps in Rocket within the Import/Export tab or watch this tutorial here.
Option 3: Import Data
If you don’t use either of those services, the quickest way is to import device data directly into Rocket.
- Go to the Import/Export tab and click the appropriate import under Custom CSV Imports if you are wanting to import devices, devices with users, or just users, then upload the CSV you exported from your system.
- Assign each column in the CSV to a field in Rocket, or select “Excluded Field”to skip that column.
- Unsure of what each field is? Go under Devices/Users > Manage Devices or Device Users to add a device or user and see what fields are available by default.
- Once you are finished mapping each column to a field, or marking to skip that column, you can click Save to start the import. It will run in the background and email when you are finished. If you get any errors, it is most likely because you didn’t include one of the required fields:
Serial Number
User/Student ID (Only required for any import with Users)
User First Name (Only required for any import with Users)
User Last Name (Only required for any import with Users) - Not seeing the field you need? Custom Fields can be added by going under Manage Devices, then in the top right is a Device Fields Settings button to add custom fields you want with your devices. These fields will show up as blue in the Custom Import.
Step 5: Fill Out Your Service Profile
The new Service Profile feature keeps all of your repair information in one place.
- Click “Service Profile” in the top-right corner of Rocket.
- Complete each section with the necessary information.
- Main Contact Info
- Shipping Location(s)
- Billing Information
- Device Models/Details
- Repair Preferences (e.g., return locations, weekly pickups)
Why it matters:
Having your Service Profile filled out means faster repairs, smoother communication, and better support overall. Plus, you can update info at any time—each section saves individually so you don’t have to complete it all at once.
Step 6: Add Parts Inventory (Optional)
Keep track of your repair parts in Rocket to make ticketing and reordering easier. You can add parts manually or select from Rocket’s database of over 3,000 SKUs.
- Go to Repairs > Manage Parts.
- Search for a part in Rocket’s database – Master Parts – or enter a custom part name using the Add Part button.
- Set the price, quantity, and reminder threshold—Rocket will notify you when stock runs low. If you have multiple buildings, you can adjust how many of each part are at each building.
- Click Add Part to add the part to your school’s inventory.
Once parts are added, you can use them directly in Repair Tickets, where using a part will decrease inventory by 1 for every ticket you use it on. You can also choose which building to pull quantity from if you have that configured (it will default to the building marked as the Return Location). As inventory decreases, a Reorder button will appear to help you restock on time.
Step 7: Create Your First Repair Tickets
To start managing your repairs in Rocket, you’ll need to start adding repair tickets for your broken devices. Watch this video tutorial or follow the instructions below.
- To create tickets, go to Repairs > Mass Ticket/Device Creation to quickly scan multiple devices, or click Create Ticket in the top-right corner of any screen to add one at a time.
- Search for the device by serial number, asset tag, student ID, or student name. If you’re scanning multiple devices with Mass Ticket Creation, use only the serial number.
- In the ticket menu, select the issue type, add notes, upload images if needed, and choose a return location. You can also decide whether the repair should be billed to the student.
- If the device will be sent to K-12 Tech for service, mark it as “Send Out for Repair.”
Once created, tickets appear under Manage Tickets, where you can monitor and update repair progress, and view a full history of device issues and parts used. Tickets can be edited if more details need to be added later.
Step 8: Send Out Your Devices For Repair (Mail-In Schools)
If your school will be mailing devices to K-12 Tech for repair, Rocket makes it easy to create your first batch and generate a free shipping label.
- Go to Repairs > Ship Devices to view all tickets marked “Send Out for Repair” along with any other open device tickets.
- Select the tickets you want to send and create a batch. We recommend shipping in batches of 5 or more devices and packing each box full to reduce costs and prevent additional breaks during shipping.
- Enter your box size, confirm your shipping and return addresses, and generate a prepaid FedEx label right from Rocket.
- Once your batch is created, it will appear in Repairs > Outgoing Batches, where you can track shipments until devices are received and repaired.
For best results, follow our Shipping Instructions to make sure devices are packed securely. If you need any help scheduling a Fedex pickup, reach out to your location manager.
Step 9: Create Help Desk
With Rocket, you get a free, customizable Help Desk to allow students and staff to submit device issues and other support tickets. You can choose between a Simple Help Desk or an Advanced Help Desk for more customization.
Simple Help Desk
The Simple Help Desk is set up in Rocket by default with no need for additional setup!
- Go to Settings → Support Ticket URL (top-left corner)
- Click Copy URL to share the unique link with staff, students, and parents.
- If you want the link publicly available, you can choose Single Sign On here.
- You do not need to add every single staff member for them to be able to access the Help Desk. SSO will check if the email domain matches your Rocket account.
- To view what staff members see, paste the link in a new tab. Your district can fill out a simple form for Support Tickets, Technology or Maintenance.
- Create Ticket Assignments to assign a team member to specific sections or buildings to
Advanced Help Desk Set Up
Our Advanced Help Desk uses an intelligent guided Q&A system that walks users through a series of troubleshooting steps based on the issue. Instead of immediately submitting a ticket, users are prompted with customized questions and solutions, dynamically adjusting based on their response. This is designed to protect your team’s time, and provide people with confidence to solve problems. Watch this video tutorial.
- Go to Help Desk → Advanced Setup to configure your Advanced Help Desk. Choose from the following two options:
- Extend Existing will copy options from the simple Help Desk along with examples to fill in the gaps.
- Create Your Own gives you a blank slate to create what you want. It starts with 2 categories: 1) Technology and 2) Maintenance.
- Adjust your Help Desk Configuration
- Create Issue Trees: You can add as many tiers of categories, subcategories, and issue types you need. You can stop at any tier you’d like.
- Add notes and images: Create instructions to guide users to troubleshoot issues on their own before submitting a ticket. Add images to clarify your instructions. If users troubleshoot correctly, they’ll mark their request as “closed,” and it won’t notify the team with a ticket.
- Create Ticket Assignments to assign a team member or group to specific sections or buildings to streamline notifications.
- This allows for employees in specific departments or roles to get notified only of tickets that fall within their job responsibilities. For example, a Network Engineer would only receive networking issues, instead of all technology tickets.
- Click Copy URL to share the unique link with staff, students, and parents.
- If you want the link publicly available, you can choose Single Sign On here.
- You do not need to add every single staff member for them to be able to access the Help Desk. SSO will check if the email domain matches your Rocket account.
To view what staff members see, paste the link in a new tab. Your district can fill out a simple form for Support Tickets, Technology or Maintenance.
Step 10: Set Up Device Complete Club (Optional)
Our Device Complete Club makes it easy for schools to offer optional repair coverage directly to families—with zero work for your tech team once it’s set up. Watch this video tutorial.
Here’s how to get started:
- Go to the “Device Complete Club” tab in Rocket.
- Click “Create Club” and fill out the setup form with more information about your devices.
- We’ll be notified when your form is submitted. Our team will add pricing and notify you for approval.
- Once pricing is confirmed, we’ll generate a shareable link for families to purchase coverage. You can share this via email, flyer, or post it on your school’s website.
Step 11: Set-Up Parts Closet (Optional)
For self-maintainer districts, our Parts Closet program delivers the parts you need right to your door on a monthly basis for an annual cost. Ordering is now even easier through Rocket. Track your parts orders and inventory all in one place. Just place your order and we’ll handle the rest. Shipping is always free. Watch this tutorial.
Here’s how to get started:
- Go to Repairs –> Manage Parts –> Master Parts
- Within Master Parts, search for your devices and add your parts.
- When you add your parts, you can adjust the quantity for each building.
- Within the School Parts tab, click the edit button under “Action” to
- Edit the price and details about the part. The set price right now is based on our average repair cost, not the actual part cost.
- Change the name of the part
- Edit the quantities
- Add a custom part by clicking “Add Part +” if it’s not in the Master Parts inventory
- To create a Parts Closet order, select the parts you want and then click “Create Order”
- Select the building you want it delivered to and the quantity
- Click “Send Order”
- Review and edit all orders within the Parts Order tab. You can still edit parts within a delivery if it’s not completed.
Ready to dive deeper?
Become a certified Rocket expert in less than an hour.
Take our free course to master Rocket and unlock its full potential. You’ll discover all the features, hidden tools, and best practices to manage your district’s technology.
Get Certified Now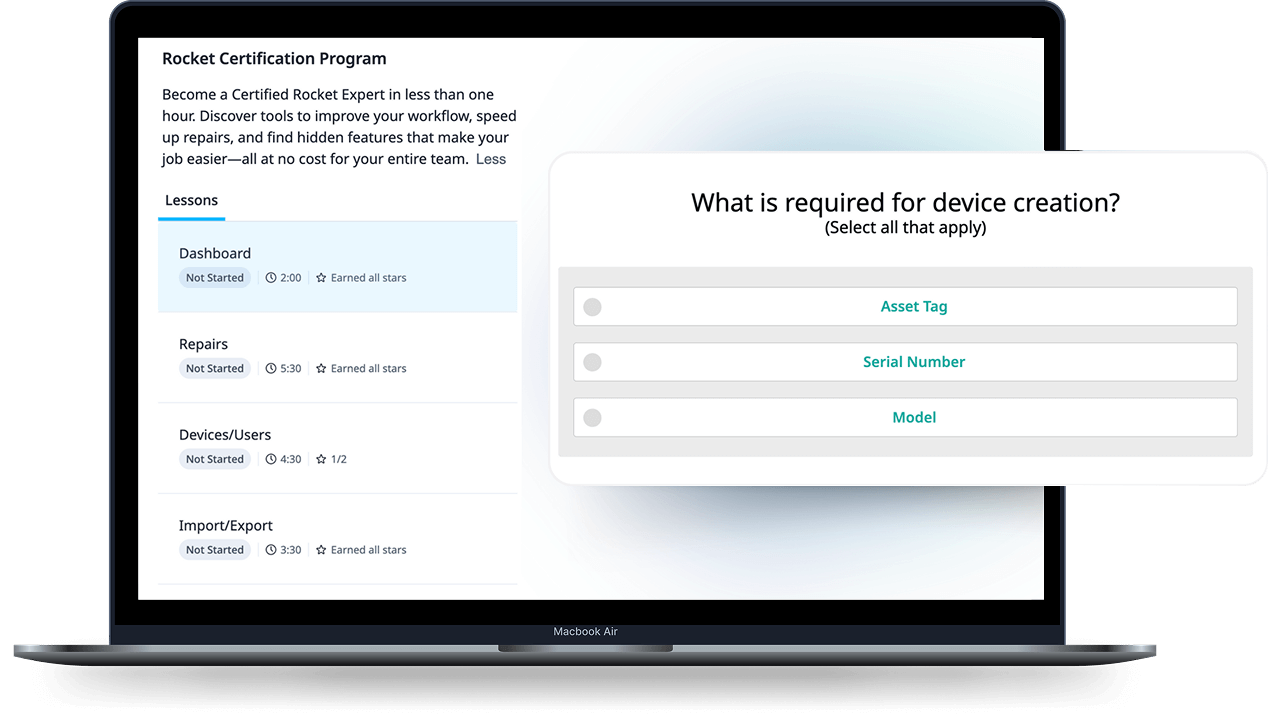
Need Help? We’ve Got You!
At K-12 Tech, we’ve been supporting schools for
13 years+ and proudly serve 400+ districts nationwide.
If you need any help with your 1:1 program, repairs, or device management, we’re here to help.
Contact Us